Hi,
since I'm now also writing stuff at AltDevBlogADay, it is hard to keep my CodingCorner busy. But maybe you will check out my articles (and all the others!) here:
Blog site: http://altdevblogaday.com/
My first post: http://altdevblogaday.com/2011/11/09/on-data-and-models-or-how-a-talk-by-jeff-ward-helped-me-get-back-on-track/
My second post: http://altdevblogaday.com/2011/11/25/with-great-powers/
Best,
Robert
Freitag, 25. November 2011
Mittwoch, 3. August 2011
Dynamic Screen Management in XNA
[DOWNLOAD SOURCES + DEMO PROJECT]
[DOWNLOAD LIBRARY ONLY]
Welcome Back!
Today, I would like to talk about screen management in XNA. For a game I recently created, I was looking for a flexible yet stable screen management model in XNA. To keep a long story short, I ended up with an own solution which I would like to share with you.
Overview
I think it’s crucial that a game developer is absolutely free to decide which screen transitions should exist in their game and when they should be performed. However, screen management can be a daunting task and it’s tedious to reprogram it for every game. So my goal was to encapsulate the boilerplate part in a game library, making it reusable (for everyone), without limiting the mentioned flexibility. It’s up to you to decide how well I achieved this goal, I really appreciate every comment.
I present my solution in terms of a 2D example game to illustrate its flexibility, scalability and stability. I start with a description of the problem space to settle a common starting point. Then, I describe how you solve the task with the DynamicScreenManagement library. The third section deals with the internals of the library and how everything works. I end this article with some related questions on XNA I stumbled upon during the development of this lib. I’m really interested in what the community thinks of these points, so feel free to share your thoughts.
Academic Preface
Since I work as a lecturer, I’m always eager to find solutions which conform to OODP. XNA sometimes makes this a hard challenge. The reason I’m telling you this is that there surely are more direct solutions for screen management. However, I wanted to be sure to create a separation of concerns in terms of what a screen needs to know and what the game class needs to know. Let’s go to the problem space to make this more vivid.
Problem Space
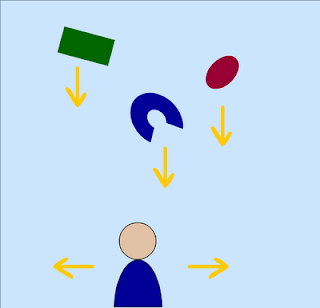
Think of a 2D game where you have to explore a game world via a map. The map contains all locations the player can travel to in the game. When a player visits a map location, a new level starts (just like in Super Mario World). We can illustrate this as a screen graph. Figure 1 shows an example of such a screen graph.
 |
| Figure 1: Example Screen Graph |
When a level or a mini game is finished, we want to return to the Map screen. Mini games return to the Map screen after a distinct amount of time (blue transition, tried to paint a stopwatch), while levels return after a distinct event happened (tried to paint a red bolt), for example after the player beats a final boss or dies.
Summing up the possible triggers of screen transitions, we have three kinds:
- Input-Driven: The player interacts with the game and triggers a screen transition by purpose. For example, the player selects the A-Button on his controller to perform the transition from Start screen to Map screen.
- Time-Driven: After a distinct amount of time has passed, the game triggers a screen transition by itself (end of a mini game).
- State-Driven: The game reaches a former defined state (scripted event), which leads to a screen transition. For example, the player reaches a certain point in a level, or dies.
Despite the great demand on flexibility and thus arbitrary wiring of screens, the necessary interface of my library is very small and easy to use (as I hope :)).
Solution Space
Let’s dive right into a demo implementation using the library (the demo game complies with the structure of Figure 1), just to see how it works.
protected override void Initialize()
{
    /*** 1. Instantiate all your screens here ***/
    Screen startScreen = new StartScreen(this, "startScreen");
    Screen mapScreen = new MapScreen(this, "mapScreen");
    Screen miniGame1Screen = new MiniGameScreen(this, "miniGame1Screen");
    Screen level1Screen = new LevelScreen(this, "level1Screen");
    Screen gameOverScreen = new GameOverScreen(this, "gameOverScreen");
    Screen endScreen = new EndScreen(this, "endScreen");

    /*** 2. Instantiate the screen manager with your game's start screen ***/
    ScreenManager screenManager = new ScreenManager(startScreen);

    /*** 3. Tell the manager which transitions should exist ***/
    screenManager.AddScreenTransitionBetween(startScreen, mapScreen);
    screenManager.AddScreenTransitionBetween(mapScreen, miniGame1Screen);
    screenManager.AddScreenTransitionBetween(miniGame1Screen, mapScreen);
    screenManager.AddScreenTransitionBetween(mapScreen, level1Screen);
    screenManager.AddScreenTransitionBetween(mapScreen, endScreen);
    screenManager.AddScreenTransitionBetween(level1Screen, gameOverScreen);
    screenManager.AddScreenTransitionBetween(level1Screen, mapScreen);
    screenManager.AddScreenTransitionBetween(gameOverScreen, startScreen);
    screenManager.AddScreenTransitionBetween(gameOverScreen, endScreen);

    /*** 4. Tell XNA which screens exist (you don't need to use the
         XNA Components, but I think it's reasonable in this context) ***/
    this.Components.Add(startScreen);
    this.Components.Add(mapScreen);
    this.Components.Add(miniGame1Screen);
    this.Components.Add(level1Screen);
    this.Components.Add(gameOverScreen);
    this.Components.Add(endScreen);

    base.Initialize();
}
We see the Initialize method of the Game1 class of the demo game, realizing four steps.
- The first step is to instantiate our game screens. Note that all screen classes need to inherit from the Screen class of the DynamicScreenManagement library. We pass the game instance (this) and a screen-ID to the constructors, which I will come back to later.
- Second, we instantiate the ScreenManager class of the library. The constructor requires a reference to the start screen of the game.
- The third step is to add transitions between our screens, using the screen manager instance. Note that here we just tell which transitions exist, not on what they depend or how they are triggered.
- Last but not least, my Screen class is a DrawableGameComponent, so we can just add our screens to the XNA component list to let the framework call their client code.
public override void Initialize()
{
    this.WireScreenTransition(InputHandler.Buttons.A, true, "mapScreen");

    base.Initialize();
}
This is the Initialize method of the Start screen. We use the inherited method WireScreenTransition to determine which button (first parameter) and which screen state (second parameter) lead to which screen (last parameter). Here, we see what we need the screen-ID for. The Start screen does not hold a direct reference to the Map screen, so that we need to make use of an ID to wire the screens up properly.
In the example, we determine that the transition from Start screen to Map screen is defined by the A-Button and the screen state true.
public override void Update(GameTime gameTime)
{
    InputHandler state = InputHandler.Instance;

    if (state.IsKeyDown(InputHandler.Buttons.A, true))
    {
        this.PerformScreenTransition(InputHandler.Buttons.A, true, false);
    }

    base.Update(gameTime);
}
In the logic part of our Start screen, we determine that, when A is pressed, the game should perform the transition which is defined by the combination of the A-Button and the screen state true. This already points to the fact that—for every screen—the combination of a pressed button and a distinct screen state must be a unique pair (the transition context), even if the button and/or the state does not trigger the transition at all.
To give two more examples, let's look at the implementation of the Map screen and then the Level screen:
public override void Initialize()
{
    /*** The player should start at the start location ***/
    this.currentMapLocation = new MapLocation("start", new Vector2(400, 10));

    /*** The transition to level 1 should be triggered when
         A is pressed and the player is at the corresponding
         map location at runtime ***/
    MapLocation level1MapLocation = new MapLocation("level1", new Vector2(400, 50));
    this.WireScreenTransition(InputHandler.Buttons.A,
                              level1MapLocation,
                              "level1Screen");

    /*** Same for the mini game 1 and end screen ***/
    MapLocation miniGame1MapLocation = new MapLocation("miniGame1", new Vector2(400, 90));
    this.WireScreenTransition(InputHandler.Buttons.A,
                              miniGame1MapLocation,
                              "miniGame1Screen");

    MapLocation endMapLocation = new MapLocation("end", new Vector2(400, 130));
    this.WireScreenTransition(InputHandler.Buttons.A,
                              endMapLocation,
                              "endScreen");

    ...
}
In the Map screen, the transition to another screen depends on the current map location of the player during runtime. Hence, we pass the locations which correspond to the given screens as second parameter when wiring the screens up. In fact, you can read the following line of code
...
this.WireScreenTransition(InputHandler.Buttons.A,
                          endMapLocation,
                          "endScreen");
just like: When "A" is pressed and the player is at the endMapLocation, the screen transition should lead to "endScreen". We perform the transition in the Update method of the class.
public override void Update(GameTime gameTime)
{
    InputHandler state = InputHandler.Instance;

    /*** Thanks to the specific screen wiring, the transition
         performance is simple: When A is pressed, we pass the current
         map location and the correct transition will be triggered.
    ***/
    if (state.IsKeyDown(InputHandler.Buttons.A, true))
    {
        this.PerformScreenTransition(InputHandler.Buttons.A,
                                     this.currentMapLocation,
                                     true);
    }
    ...
Here, we can use the runtime value of the currentMapLocation to trigger the correct transition when the A-Button is pressed. Easy, isn’t it?
Now, how does it work when the player input is not responsible for the performance of a transition? Very similar, as the Level screen shows:
public override void Initialize()
{
    /*** In this screen, we see how to wire screen transitions
         which are not triggered by user input. Apparently, the
         first two parameters do not matter. Their combination just
         needs to be unique for every transition from this screen.
         We just need to tell where the screen transition needs to point
    ***/
    this.WireScreenTransition(InputHandler.Buttons.Empty,
                              false,
                              "gameOverScreen");
    this.WireScreenTransition(InputHandler.Buttons.Empty,
                              true,
                              "mapScreen");
    base.Initialize();
}
The wiring process of the Level screen looks a little bit different, using the same method. There is no user input that triggers the transitions this time. Nonetheless, we need to state a unique button--state pair (transition context) to define every transition. In the game logic, we use this context to perform the transition of choice.public override void Update(GameTime gameTime)
{
if (firstUpdate)
{
this.randomNumber = random.NextDouble();
this.firstUpdate = false;
}
this.playerEnergy -= gameTime.ElapsedGameTime.TotalSeconds;
if (randomNumber < 0.5f)
{
/*** When the player is dead, we perform the transition
to the gameOverScreen ***/
if (this.playerEnergy <= 0)
this.PerformScreenTransition(InputHandler.Buttons.Empty,
false,
false);
}
else
{
/*** in this case, we simulate a successful play and
return to the map screen ***/
if (this.playerEnergy <= 1)
this.PerformScreenTransition(InputHandler.Buttons.Empty,
true,
false);
}
base.Update(gameTime);
}
For the demo, I use a random number to determine how the level ends. Either, the player dies and we perform the transition to the Game Over screen, or the player beats the level and we return to the Map screen.That's how it's applied. Now, let's have a look at the internals to see why it works this way.
The Internals
First, I would like to note that you can find the library (with all commented sources and the demo game) here [PROJECT + DEMO SOURCES DOWNLOAD].
The class structure of the library is illustrated in Figure 2. We see a very slim ScreenManager class. It knows the Start screen and offers the method to add transitions between screens. I also added a Reset method that iterates over the screen list and calls every ResetScreen method.
 |
| Figure 2: Class Diagram (click to enlarge) |
So, what's that ID stuff about? The problem is that a screen, when it wires up its transitions using the corresponding transition context objects (the method "WireScreenTransition", compare the Initialize methods of the screens above), it does not hold an instance of the target screen. Using an ID solves this problem, since we can use the transition context as a key to the corresponding screen ID, while we use the same screen ID as a key in another Dictonary to point to the corresponding screen. In the same time, this bears the issue that a game developer must be sure to use the same ID for a screen at two different locations. I illustrated this functionality in Figure 3.
 |
| Figure 3: How the wiring works (click to enlarge) |
Well, I'm very interested what the community thinks of my approach. There are several aspects I consider critical by myself, but in practice, it turned out that the library works fine, especially when adding and wiring up new screens to a given game. What's more, you can playtest every screen very simple by adding the screen of choice as the start screen to the screen manager.
As an additional layer of abstraction, I think of an interface like realized in the SharpLudus project.
Furthermore, I would like to discuss some questions that might have come up during reading the text. At least, they came up while programming the library here ;)
Q: Why are the methods WireScreenTransition and PerformScreenTransition not overloaded, so that I would not have to state a button--state pair if it is not useful for my transition?
A: It would be possible to add overloaded versions, but this would bear several issues. The button--state pair defines a transition, even if it does not relate to it directly. Offering a overloaded version where the caller does not need to provide the context information results in a method that could only be called once. A design I don't like.
Q: What is that InputHandler class doing here?
A: The InputHandler is a hangover of the game where I wrote the screen management for. You can rewrite the library very easy for "XNA-native" controller respectively keyboard input. I jus tlike the small InputHandler since I can play my game with both input devices and since it can distinguish a key down event as a single event if you use the overloaded method ;)
Q: Isn't it error-prone to use an ID at two different locations to wire the screens up?
A: Yes, it is, but I don't have a better solution so far.
Q: Why did you built this stupid SpriteBatchHolder solution which is not thread-safe anyway?
A: My motivation is to draw on one and the same SpriteBatch object, since I suppose (and this might be rubbish), that there might be a performance issue using one SpriteBatch for every screen. Who knows more? It's not thread-safe, true, and it's not really a singleton, but since it is realized as a private inner class, there should not be a problem of multiple instances. One could add a locking mechanism if desired.
Q: So why didn't you just use the XNA Services to make the SpriteBatch available to everyone like described here?
A: I don't like the idea of global available references. My solution makes the SpriteBatch available to who should know about it, the screens, no one more, no one less.
Freitag, 25. März 2011
Optimized Bounding Boxes in XNA
Hi everyone,
for a small project I'm currently working on, I have to deal with 2D collision detection in XNA. There are many great tutorials out there, which I made (and make) extensively use of. However, none of the ones I found deals exactly with the problem I am going to describe right now. Afterwards, I would like to share my solution with you and I hope that some of you might be able to apply it. [UPDATE: See the code in a running XNA 4.0 Example Project here]. Refer to Riemer's wonderful blog, where my solution grounds on. What's more, I'm really looking forward for comments of what you think of my solution :).
Disclaimer
I think this is not an article for absolute beginners. I'm not going to explain the very basics of XNA but I will do my best to explain my bounding box optimization step-by-step.
Problem DescriptionTo illustrate the context, I will use a classical gameplay mechanic as example. Think of a game where objects are randomly spawn at the top of the screen and then fall downwards. The player needs to navigate a player character at the bottom of the screen that catches the falling objects.
A 2D texture loaded in XNA (sprite) always has fixed bounds which are determined by the graphic file that is loaded. However, it is often necessary to draw such a sprite in a transformed way. Our falling objects, for example, should vary in scale and rotation. Both could be determined randomly.
A simple way to realize collision detection is to use the surrounding rectangles of two objects and check if they intersect. In order to do so we need to adapt the bounding box of a sprite and consider it's position, scale, origin and rotation. This issue has been addressed by Riemer very well and I used his solution (I will round it up a little bit later in the solution section). However, the rotation of objects still bears an issue. Take a look at the following picture.
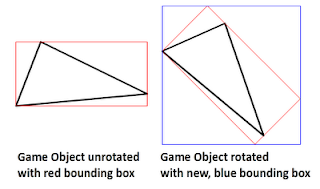 On the left side, we see a triangle object unrotated with its red bounding box. Bounding boxes are of type "Rectangle" which is defined by an origin (X and Y coordinates of the upper left corner) and a Width and a Height property. That way, bounding boxes are always axes oriented so that the bounding box of the triangle object on the right side is described by the blue rectangle. My goal was to optimize the bounding box further so that the transparent parts are cropped.
 In the end, my algorithm works in two steps. First, I use Riemers transformation to calculate the blue bounding box. Then, I crop the transparent bars on left, top, right, and bottom. Let's see how it works!
Solution
Alright, first, it is wise to use a class--commonly named GameObject--which derives from DrawableGameComponent and represents the base class for, well, all drawable game objects in your game. This class stores all information regarding a game object and is responsible for updating and drawing it. For the given context, the necessary fields are:
This is how I fill the pixelData array when a GameObject-Instance is created:
Alright, now for the meat. Whenever a GameObject is updated, we need to update its bounding box. As I mentioned, I do this in two steps, so I will explain the algorithm in two steps.
Step1: Finding the blue bounding box
As I mentioned before the first step is pretty much what Riemer describes here and here. I create a Matrix that transforms the bounds of the game object's sprite from local space to world space. The matrix "toWorldSpace" contains the necessary translations (origin and position), scale and rotation. The method "CalculateTransformedBoundingBox" receives the sprite's bounding box in local space (0,0, width, height) and the transformation matrix. What happens next is that the four edges of the rectangle are transformed one after another. The thus transformed coordinates actually describe the red rectangle that can be seen in the above images for the transformed game object in world space. The following image sums the transformation up that is applied through the matrix "toWorldSpace" to the four coordinates in the lines 26 to 33.
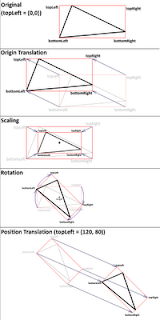 Because of the axes-orientation of rectangle objects, however, we cannot describe the rotated rectangle by four coordinates. Instead, we must use the four coordinates to calculate the blue bounding box by the minimum and maximum extends of the red rectangle instead.
Now, how are we able to crop the transparent pixels? This is the bit tricky part. Let's take a look at the code:
Step2: Finding the green bounding box
So, the attentive readers might have noticed that the shown nested for-loops iterate column-by-column through the pixels. Thus, the given loops crop the left side of our blue bounding box which in consequence means that we find the optimized X-coordinate. If we did, we can leave both loops and start another run to similarly find the optimized Y-coordinate.
Best,
Robert
for a small project I'm currently working on, I have to deal with 2D collision detection in XNA. There are many great tutorials out there, which I made (and make) extensively use of. However, none of the ones I found deals exactly with the problem I am going to describe right now. Afterwards, I would like to share my solution with you and I hope that some of you might be able to apply it. [UPDATE: See the code in a running XNA 4.0 Example Project here]. Refer to Riemer's wonderful blog, where my solution grounds on. What's more, I'm really looking forward for comments of what you think of my solution :).
Disclaimer
I think this is not an article for absolute beginners. I'm not going to explain the very basics of XNA but I will do my best to explain my bounding box optimization step-by-step.
Problem DescriptionTo illustrate the context, I will use a classical gameplay mechanic as example. Think of a game where objects are randomly spawn at the top of the screen and then fall downwards. The player needs to navigate a player character at the bottom of the screen that catches the falling objects.

A 2D texture loaded in XNA (sprite) always has fixed bounds which are determined by the graphic file that is loaded. However, it is often necessary to draw such a sprite in a transformed way. Our falling objects, for example, should vary in scale and rotation. Both could be determined randomly.
A simple way to realize collision detection is to use the surrounding rectangles of two objects and check if they intersect. In order to do so we need to adapt the bounding box of a sprite and consider it's position, scale, origin and rotation. This issue has been addressed by Riemer very well and I used his solution (I will round it up a little bit later in the solution section). However, the rotation of objects still bears an issue. Take a look at the following picture.
 On the left side, we see a triangle object unrotated with its red bounding box. Bounding boxes are of type "Rectangle" which is defined by an origin (X and Y coordinates of the upper left corner) and a Width and a Height property. That way, bounding boxes are always axes oriented so that the bounding box of the triangle object on the right side is described by the blue rectangle. My goal was to optimize the bounding box further so that the transparent parts are cropped.
 In the end, my algorithm works in two steps. First, I use Riemers transformation to calculate the blue bounding box. Then, I crop the transparent bars on left, top, right, and bottom. Let's see how it works!
Solution
Alright, first, it is wise to use a class--commonly named GameObject--which derives from DrawableGameComponent and represents the base class for, well, all drawable game objects in your game. This class stores all information regarding a game object and is responsible for updating and drawing it. For the given context, the necessary fields are:
private Vector2 position;
private Texture2D sprite;
private Vector2 velocity;
private Vector2 origin;
private float rotation;
private float scale;
private Rectangle boundingBox;
private Color[,] pixelData;
Nothing very special here, besides the fact that I use a 2D-Array to store the pixel data of a sprite. It would also work with an 1D-Array, however, I just prefer working with a 2D-array since I think the access by index is easier. We need the pixelData later to be able to find the non-transparent pixels.
This is how I fill the pixelData array when a GameObject-Instance is created:
private Color[,] TextureTo2DArray()
{
Color[] colors1D = new Color[this.sprite.Width *
                            this.sprite.Height];
this.sprite.GetData(colors1D);

Color[,] colors2D = new Color[this.sprite.Width,
                             this.sprite.Height];
for (int x = 0; x < this.sprite.Width; x++)
   for (int y = 0; y < this.sprite.Height; y++)
       colors2D[x, y] =
       colors1D[x + y * this.sprite.Width];

return colors2D;
}
Note that I found this code in another forum or blog, I cannot remember anymore, but it works just fine :).Alright, now for the meat. Whenever a GameObject is updated, we need to update its bounding box. As I mentioned, I do this in two steps, so I will explain the algorithm in two steps.
Step1: Finding the blue bounding box
protected virtual void UpdateBoundingBox()
{
Matrix toWorldSpace =
   Matrix.CreateTranslation(new Vector3(-this.origin, 0.0f)) *
   Matrix.CreateScale(this.scale) *
   Matrix.CreateRotationZ(this.rotation) *
   Matrix.CreateTranslation(new Vector3(this.position, 0.0f));

this.boundingBox = CalculateTransformedBoundingBox(
   new Rectangle(0, 0, this.sprite.Width, this.sprite.Height),
   toWorldSpace);

// more to come here in step 2
}

private Rectangle CalculateTransformedBoundingBox
(Rectangle local, Matrix toWorldSpace)
{
// Get all four corners in local space
Vector2 leftTop     = new Vector2(local.Left, local.Top);
Vector2 rightTop    = new Vector2(local.Right, local.Top);
Vector2 leftBottom  = new Vector2(local.Left, local.Bottom);
Vector2 rightBottom = new Vector2(local.Right, local.Bottom);

// Transform all four corners into work space
Vector2.Transform(ref leftTop, ref toWorldSpace,
                 out leftTop);
Vector2.Transform(ref rightTop, ref toWorldSpace,
                 out rightTop);
Vector2.Transform(ref leftBottom, ref toWorldSpace,
                 out leftBottom);
Vector2.Transform(ref rightBottom, ref toWorldSpace,
                 out rightBottom);

// Find the minimum and maximum extents of the
// rectangle in world space
Vector2 min = Vector2.Min(Vector2.Min(leftTop, rightTop),
                         Vector2.Min(leftBottom, rightBottom));
Vector2 max = Vector2.Max(Vector2.Max(leftTop, rightTop),
                         Vector2.Max(leftBottom, rightBottom));

// Return that as a rectangle
return new Rectangle((int)min.X, (int)min.Y,
                    (int)(max.X - min.X), (int)(max.Y - min.Y));
}
As I mentioned before the first step is pretty much what Riemer describes here and here. I create a Matrix that transforms the bounds of the game object's sprite from local space to world space. The matrix "toWorldSpace" contains the necessary translations (origin and position), scale and rotation. The method "CalculateTransformedBoundingBox" receives the sprite's bounding box in local space (0,0, width, height) and the transformation matrix. What happens next is that the four edges of the rectangle are transformed one after another. The thus transformed coordinates actually describe the red rectangle that can be seen in the above images for the transformed game object in world space. The following image sums the transformation up that is applied through the matrix "toWorldSpace" to the four coordinates in the lines 26 to 33.
Now, how are we able to crop the transparent pixels? This is the bit tricky part. Let's take a look at the code:
Step2: Finding the green bounding box
this.boundingBox = CalculateTransformedBoundingBox(
  new Rectangle(0, 0, this.sprite.Width, this.sprite.Height),
  toWorldSpace);

Matrix boundingBoxTranslation = Matrix.CreateTranslation(
  new Vector3(this.boundingBox.X, this.boundingBox.Y, 0.0f));

Matrix toTextureSpace = boundingBoxTranslation *
                   Matrix.Invert(toWorldSpace);
int orignalWidth = (int)(this.sprite.Width);
int originalHeight = (int)(this.sprite.Height);
int targetWidth = this.boundingBox.Width;
int targetHeight = this.boundingBox.Height;

bool finished = false;
for (int x1 = 0; x1 < targetWidth; x1++)
{
for (int y1 = 0; y1 < targetHeight; y1++)
{
   Vector2 localPosition = new Vector2(x1, y1);
   Vector2 texturePosition = Vector2.Transform(
                             localPosition,
                             toTextureSpace);

   int x2 = (int)texturePosition.X;
   int y2 = (int)texturePosition.Y;

   if ((x2 >= 0) && (x2 < orignalWidth) &&
       (y2 >= 0) && (y2 < originalHeight))
   {
       if (this.pixelData[x2, y2].A > 0)
       {
           this.boundingBox.X =
               (int)Vector2.Transform(
                   localPosition,
                   boundingBoxTranslation).X;
           finished = true;
           break;
       }
   }
}
if (finished)
{
   finished = false;
   break;
}
}
After we calculated the blue bounding box, we have to iterate over the lines and columns of this box and check every position if there is a transparent pixel or not. However, the bounding box actually has no "pixels". Our pixelData is stored in a "local space" representation for the game object's sprite. So, what we do is to first identify the "screen pixel" (world space) by translating from local space to the position of the bounding box. This is achieved by applying the "boundingBoxTranslation" matrix. Secondly, we use the inverted "toWorldSpace" Matrix to find the sprite's corresponding pixel which is actually drawn at the current screen position. We can combine these two steps easily in one matrix by multiplying the bounding box translation matrix with the inverse "toWorldSpace" matrix. Since this is the central part of the algorithm, let us reconsider://This matrix translates a coordinate by the position of the
//blue bounding box
Matrix boundingBoxTranslation = Matrix.CreateTranslation(
new Vector3(this.boundingBox.X, this.boundingBox.Y, 0.0f));
// In order to find the coordinates of the texture's pixel that
// is drawn at the screen position, the inverted matrix from
// before can be used
Matrix toTextureSpace = boundingBoxTranslation *
Matrix.Invert(toWorldSpace);
//...
for(...
for(...
// coordinate in local space
Vector2 localPosition = new Vector2(x1, y1);
// by applying this transformation, we get the
// cooresponding coordinate of the texture to
// figure out its pixel's alpha value
Vector2 texturePosition =
Vector2.Transform(localPosition, toTextureSpace);
// ...
That way, we get the actual pixel of our texture at the position inside the blue bounding box. Since it might be possible that the found texture position is outside the bounds of our original sprite, we have to consider this. If the texture position is inside, however, we can check the pixels alpha value. In case it is not totally transparent, we found a bound of our new bounding box!So, the attentive readers might have noticed that the shown nested for-loops iterate column-by-column through the pixels. Thus, the given loops crop the left side of our blue bounding box which in consequence means that we find the optimized X-coordinate. If we did, we can leave both loops and start another run to similarly find the optimized Y-coordinate.
for (int y1 = 0; y1 < targetHeight; y1++)
{
for (int x1 = 0; x1 < targetWidth; x1++)
{
   Vector2 pos1 = new Vector2(x1, y1);
   Vector2 pos2 = Vector2.Transform(pos1, toTextureSpace);

   int x2 = (int)pos2.X;
   int y2 = (int)pos2.Y;

   if ((x2 >= 0) && (x2 < orignalWidth) &&
       (y2 >= 0) && (y2 < originalHeight))
   {
       if (this.pixelData[x2, y2].A > 0)
       {
           this.boundingBox.Y = (int)Vector2.Transform(pos1, boundingBoxTranslation).Y;
           finished = true;
           break;
       }
   }
}
if (finished)
{
   finished = false;
   break;
}
}
Now, we iterate line-by-line, which means that we find our optimized Y-coordinate that way fast. For the sake of completeness, here are the loops to find the width and height afterwards:for (int x1 = targetWidth-1; x1 >= 0; x1--)
{
for (int y1 = targetHeight-1; y1 >= 0; y1--)
{
Vector2 pos1 = new Vector2(x1, y1);
Vector2 pos2 = Vector2.Transform(pos1, toTextureSpace);
int x2 = (int)pos2.X;
int y2 = (int)pos2.Y;
if ((x2 >= 0) && (x2 < orignalWidth) &&
(y2 >= 0) && (y2 < originalHeight))
{
if (this.pixelData[x2, y2].A > 0)
{
this.boundingBox.Width = (int)Vector2.Transform(pos1, boundingBoxTranslation).X - this.boundingBox.X;
finished = true;
break;
}
}
}
if (finished)
{
finished = false;
break;
}
}
for (int y1 = targetHeight - 1; y1 >= 0; y1--)
{
for (int x1 = targetWidth - 1; x1 >= 0; x1--)
{
Vector2 pos1 = new Vector2(x1, y1);
Vector2 pos2 = Vector2.Transform(pos1, toTextureSpace);
int x2 = (int)pos2.X;
int y2 = (int)pos2.Y;
if ((x2 >= 0) && (x2 < orignalWidth) &&
(y2 >= 0) && (y2 < originalHeight))
{
if (this.pixelData[x2, y2].A > 0)
{
this.boundingBox.Height = (int)Vector2.Transform(pos1, boundingBoxTranslation).Y - this.boundingBox.Y;
finished = true;
break;
}
}
}
if (finished)
{
break;
}
}
I suppose that's it! Feel free to drop me a comment. I am going to cut the code out of my project to be able to share it with you here the next days. [UPDATE: You find the project here.]Best,
Robert
Abonnieren
Posts (Atom)